
Final Report
Alexander Liang, Christina Neumann, Yi Mu, Yueheng Zhang
Abstract
In this project, we developed a real-time, 3D smoke simulator that allows the user to create visually appealing smoke with 9 parameters which user can interact with. We utilized the smoke density temperature, velocity to generate a realistic 3D rendering of the smoke. The simulation results are presented in the form of visualizations that showcase the evolution of the smoke over time. The presented approach is expected to be useful in fields such as fire safety engineering, computer graphics, and special effects in film and television. Existing implementations of real-time fluid simulations are all in 2D. But with modern hardware and a staggered grid there’s no reason why we cannot push it to an interactive 3D simulation.
Technical approach
Tech Stack
In order to better present the interactive 3D experience, we chose to use Threejs and WebGL as our main frameworks, and utilized Typescript and Vite for development and building. We then deployed the page to github pages, hosted a demo here: https://nociza.github.io/SmokeSculpter/demo/index.html
Algorithms
Shaders
We created GLSL Shaders for each of the corresponding components in stable fluids simulation. The shaders are written using WebGL and stored in separate files. Since WebGL only takes in a pure string we utilized the fetch function to open the files and get the string when the user loads the webpage. We started with a 2D version of a combined glsl shader
We implemented the following shaders according to the Jos Stam et al.
- buoyancy
- density advection
- velocity advection
- pressure (divergence)
3D Fluid Grid
We utilized a staggered grid, which represents scalar quantities (such as pressure) at cell centers and vector quantities (such as velocity) on the boundaries between cells. For a three-dimensional grid, we would have 6 such quantities per cell. We broke the stable fluid calculation into different components and split them up into different shaders to be called separately if needed.
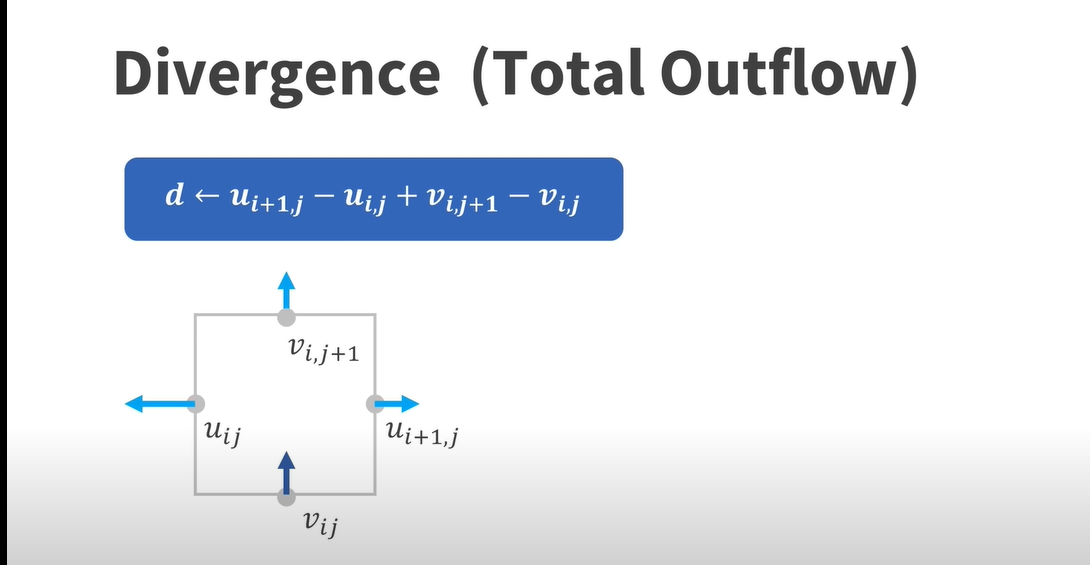
One advantage of using staggered grids is that divergence (2D example above) can be calculated exactly. In our case we utilized a combined “pressure” shader that made sure that the grids are divergence-free.
Path Tracing
To make the smoke look volumetric and more realistic in 3D we added zero-bounce path tracing when projecting the 3D simulated material to the 2D cube-faces. We utilized ray-marching with identical steps to simplify the integration. (Wald 2004)
Problems Encountered
Coordinate Translation
We encountered a unique problem when trying to create the “simulation cube” at the middle of the scene: the image on the six sides of the cube needs to be there correct regardless of where the camera is. But we would also want the shaders to handle ray tracing and therefore return a 2-dimensional coordinate after calculation. We therefore implemented three different coordinate systems:
- The 3D simulation space, used by the shaders to index cells and calculate smoke attributes
- The 2D cube-face space, used as a “screen” wrapped around the six sides of the cube
- The 2D screen space, the actual canvas that’s shown to us, this is where the camera translations are
Mouse Position
Another interesting problem is how to translate a 2D click onto a 3D scene and make the click intuitive to the user. We implemented an elegant solution that generates a plane that goes through (0, 0, 0) and that’s perpendicular to the camera direction. The user would feel like they are actually clicking on a plane and by moving the camera the user would be able to reach any point in the 3D space.
Lessons Learned
Simulating smoke in 3D is a difficult task. While we found many resources on simulating smoke in 2D, they did not translate well into 3D and were not very useful. The representation of the grid was also challenging due to the numerous moving parts that had to be calculated, making it computationally expensive. Although we initially aimed to include object collision, the resources we started with required us to rework too much of the code in a short amount of time. As a result, we did not achieve the desired outcome.
Despite the challenges, we gained valuable insights into how smoke simulation works, the interaction between Javascript and glsl shaders, and the power of Three.js in making the rendering and interaction with the simulation easier. We discovered that delegating resource-intensive calculations to the GPU yields much faster overall results. (Although we did not benchmark it, we initially wrote 3D to 2D projection translation functions in Javascript and found it to be very slow.)
Results
Gifs

In this rendering we only show smoke particle density as the simulation evolves. The denser the smoke particles the darker the color.

This shows a colorful 3D vector field of the velocity value of each cell. The cells with low particles are still colored that’s why the grid is more pronounced
Live Demo Website
https://nociza.github.io/SmokeSculpter/demo/index.html
Video Demo
References
Papers / Presentations
https://web.stanford.edu/class/cs237d/smoke.pdf
https://cs184.eecs.berkeley.edu/sp23/lecture/20-9/fluid-simulation
https://developer.nvidia.com/sites/all/modules/custom/gpugems/books/GPUGems/gpugems_ch38.html
Tutorials
https://www.youtube.com/watch?v=iKAVRgIrUOU

Github Repos
http://users.csc.calpoly.edu/~zwood/teaching/csc471/finalF20/waidhofer/index.html
 https://github.com/dataarts/dat.guihttps://github.com/aadebdeb/WebGL_SmokeSimulation
Contributions from each team member
Alexander Liang
Helped write presentations and worked on collisions, smoke generation, and the GUI. Helped with initial prototyping and object generation.
Christina Neumann
Co-wrote project proposal and other reports, corresponded with course staff, helped organize resources and team meetings. Set up three.js objects and the perpendicular plane and helped debugging process.
Yi Mu
Helping Yueheng Zhang creating the general structure of the project, co-wrote project proposal and both reports and ppt.
Yueheng Zhang
Yueheng is mostly in charge of creating the general structure of the project and rewriting 2D rendering logic as well as glsl shaders into 3D. He also worked on coordinate translation and camera movement.